As a professional organizer, I am up for organizing anything, anytime, anywhere. From cluttered closets to piles of paperwork, I enjoy the challenge and transformation of the organizing process. I like to organize all the things… with the single exception of photo organizing. Simply put, I hate it.
I’m not ashamed to admit it. I’d been putting off the overwhelming task of sorting, downsizing, and organizing our family’s photo collection for years. We had photos in old albums that were falling apart. I had shoeboxes of loose photos. Hundreds of photos hid out on my iPhone and computer photo gallery, unprinted and ignored. I was actually close to hiring a colleague to tackle this project with me. But this past fall, I finally just decided to dive in. I found the system I wanted to use. I picked up the supplies. And I gave myself as long as I needed to get it done. I told myself that when I got tired or frustrated, I could just put it away and come back when I was ready. Curious how I did it? Keep reading to learn my process! FIRST, DECIDE ON A SYSTEM
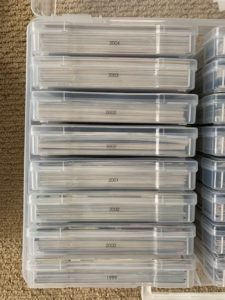
I opted to group photos by year in small plastic (acid-free/photo-safe) boxes, one box per year. These small boxes would be housed in two larger boxes. Each large storage box holds 16 small boxes. That would be a total of 32 small boxes. I picked up two large boxes from Michael’s for $15 each on sale. (Each comes with the 16 small, so total investment was just $30.) I like that they snap shut (making them water-tight) and stack for easy storage. (Click the picture above to link to the product I bought.)
GATHER ALL THE PHOTOS
Next, I gathered all the photos in one area. This was pretty easy because I stored them all within one cupboard in our living room. As most of the photos were housed in old albums that were starting to fall apart, I started the process of taking photos out of albums, one at a time. I enlisted my husband to help, not caring if the album pages ripped. I knew I would be tossing all the albums anyway.
SORT, LABEL PILES, HAVE A TOSS BOX
I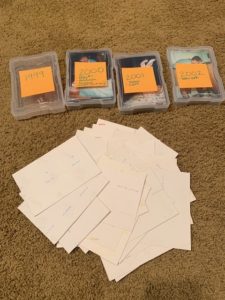 decided to categorize by year, so I used sticky notes to help label those piles. At the end of each organizing session, I put the photos into the small boxes with a sticky note on top (noting the year and perhaps a broad category). This was a work in progress, so permanent labels would come later.
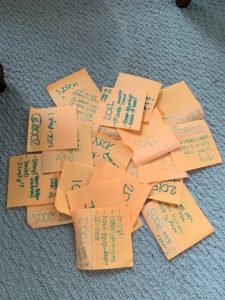
 I made a point to toss many photos. I looked for duplicates, anything blurry, or photos that didn’t have people in them. This rough sort and toss helped me eliminate MANY photos. As I moved further into the process, I refined even further, trying to get down to just the best photos, resulting in one box per year (starting with the year our first son was born in 1999, up through 2000.) I also ended up with a full box for each of our son’s senior photos, plus a few boxes that housed multiple years from our pre-kid years. The photo at left shows my “toss” pile. It felt so good to let those go!
REFINE AND KEEP GOING
 I’m not going to lie. This process was slow-going and somewhat painful for me. It gave me a lot of empathy for my clients. Organizing is not always fun. But I knew the final results would be wonderful. I worked on this project from September through early January. It took me four months to do it. Some weeks, I would do nothing. If I had a spare hour, I would do what I could. Once everything was sorted and put into boxes, it was time to remove the sticky notes and label them appropriately.
LABEL LIKE A PRO
I opted to use clear Avery labels that I could run through my computer printer, rather than using a label maker. I knew this would save time creating 32 labels. I also decided to put a label on the large side of each little box that gave some clues to general categories in each box, such as the ages of my kids, or trips we took that year, etc.
BASK IN THE POST-ORGANIZING JOY
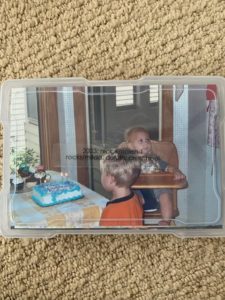
It’s done! Every photo is neatly categorized and safe in its labeled box. Joy! Having a finite number of boxes forced me to eliminate photos that weren’t that great. The two boxes stack neatly and fit perfectly in my living room credenza. It’s easy to pull out a box and flip through a specific year of memories.
WHAT I DIDN’T ORGANIZE
Each kid also has three scrapbooks, filled with photos, mementos, schoolwork, etc. Those were untouched, and someday, they can take those to their homes. The professional wedding album was left as is. But everything else was pulled into this new photo box system.
WHY IT TOOK SO LONG
Hypothetically, I could have completed this task in a weekend or two. But I didn’t want to hate the process that much. I wanted to take my time. It was a low priority. Life is busy. It was a small-space project to box up and put away when I was sick of it. Not every organizing project could be handled this way. But for me, this worked. If you’re contemplating a photo organizing project, I hope reading my process helps you map it out. Ready, set, organize!
Want to learn how to become a professional organizer? Click here!